Rate Types (previously known as Price Types) allow you to define different levels of pricing for a Product. There are two default Rate Types in eviivo frontdesk.
Best Available: this applies to your online and offline bookings and should be used in most situations
Freeform: this can be used when you need to make manual adjustments to offline bookings
Frontdesk also provides the flexibility to specify custom Rate Types. These are not generally required but can be used if you have agreed a cheaper rate with one particular distribution channel.
In the past there were more default rate types (Auto, Rack, Information Centre and Wholesale). If any of these rate types were used in the past, they will probably still be appear in your frontdesk software.
Apply a Rate Type to a Product
Activate Your Custom Rate Type on Distribution Channels
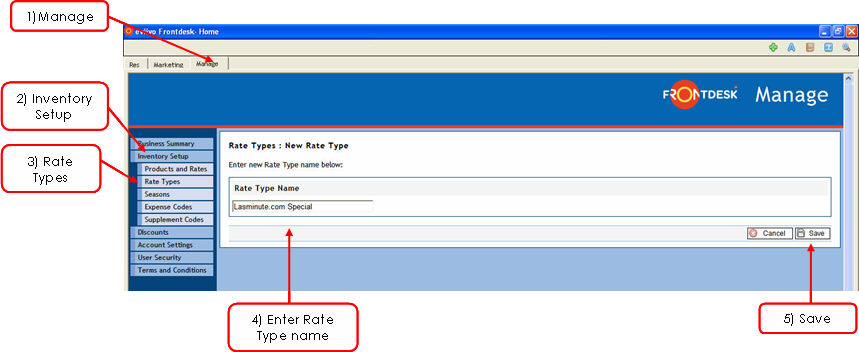
1. Click on the Manage tab
2. Click on Inventory Setup in the menu on the left
3. Click Rate Types in the menu on the left
4. Click on the " New Rate Type" button.
5. Enter a name for the new Rate Type e.g. "Lastminute.com Special"
6. Click on the " Save" button.
Creating a New Rate Type:
Apply a Rate Type to a Product
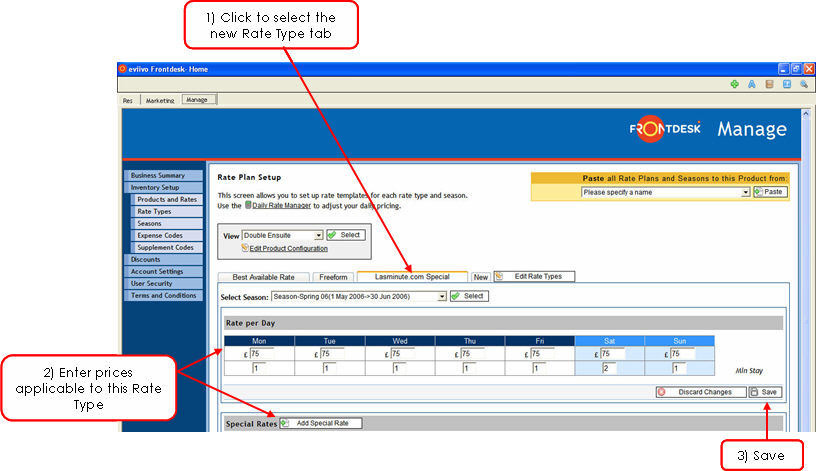
1. Click on the Manage tab
2. Click on Inventory Setup in the menu on the left
3. Click Products and Rates
4. Click the name of the Product you wish to apply the Rate Type to (e.g. Double Ensuite)
5. Scroll down and click ".gif) Add Rate Plan"
Add Rate Plan"
6. Enter the prices applicable to this Rate Type (e.g. the Double Ensuite may be on sale for a slightly cheaper rate on Lastminute.com)
7. " Save"
Applying a Rate Type to a Product:
Activate Custom Rate Type on Distribution Channels
So far you have created a custom Rate Type and applied it to a product. In order for a custom Rate Type to be 'active' online, you need to opt in to the relevant distribution channel with the new Rate Type. This is the final step. See Opting in to Distributors for step-by-step instructions on how to do this.
1. Click on the Manage tab
2. Click on Inventory Setup in the menu on the left
3. Click on Rate Types from the menu on the left
4. If you have previously created any Rate Types, a summary will be shown under Custom Rate Types.
5. Click on the “ Edit” button beside the Rate Type to be modified.
6. Make the necessary changes to the name of the Rate Type.
7. Click on the " Save" button.
1. Click on the Manage tab
2. Click on Inventory Setup in the menu on the left
3. Click on Rate Types in the menu on the left. If you have previously created any Rate Types, a summary will be shown under Custom Rate Types.
4. Click on the " Delete" button beside the Rate Type to be removed from the list.
5. Note the Warning and confirm the deletion.
It is not possible to delete a Rate Type if there are existing bookings for that Rate Type.