![]()
![]()
![]()
![]()
'My Booking Pages' are the online forms automatically created for you to enable your customers to search and book your products online. These Booking Pages will appear on your website once we've added a Book Now Button, and will also be used by many other online Distributors (once you've opted-in to them). The My Booking Pages tab gives you access to information about your Booking Pages, and tools that allow you to customise them so that they match the way you run your business.
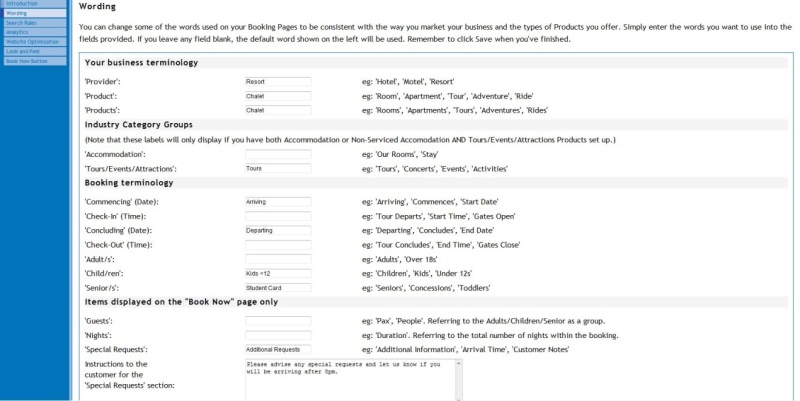
You can change some of the standard words used on your Booking Pages to be consistent with the way you market your business and the types of products you offer.
Click on the My Booking Pages tab in frontdesk.
Click on 'My Booking Pages wording'.
Each field represents a standard or 'default' word/term
used on your Booking Pages. In each field provided, enter the words
you want to use to replace these. The following screenshot shows some
examples:

Note that if you leave any field blank, the 'default' wording will be used.
Click Save.
You can then check your Booking Pages to see the changes. Any changes you make will appear on the Book Pages linked to your own website, plus any other Distributor sites that use these Booking Pages. To check your Booking Pages, click on the Book Now Button menu item.
You can control what your customers see and choose when they are searching on your Booking Pages. Choose the settings that match the way you run your business and sell your products. Some of the most common requirements are:
Hide the ability for customers to search and book Children or Concessions/Seniors
Default the search to a specific date
Default to search to a specific number of guests and nights
Stop bookings for today or tomorrow
Click on the My Booking Pages tab in frontdesk.
Click on 'Search rules'.
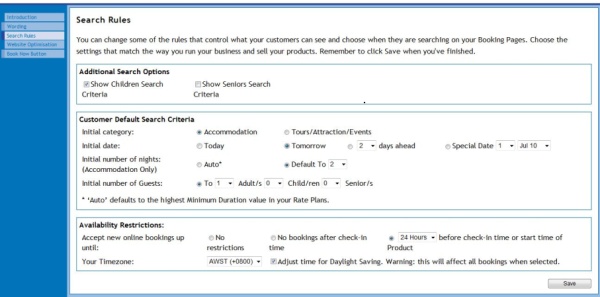
Select your preferences - refer to screen shot below. Following is an explanation of each setting:
Additional Search Options: Select whether customers are able to search for Children and/or Seniors (note the name of these boxes can be changed in Wording section above). If you don't allow Seniors/Concession discount, you should untick this box.
Customer
Default Search Criteria
Initial Category: This
is only relevant if you offer Accommodation plus Tours, Attraction
or Events products. You can select which category is presented
for search first.
Initial Date: This is
the date that the search box defaults to when the customer first
views your booking pages. If you have an event that only occurs
on one day, or starts on a day in the future, select Special Date.
Initial Number of Nights:
This is the number of nights the search box defaults to. If you
want to encourage 2 or more nights booking, set to 2 etc. The
customer can choose to change it to another number. Selecting
'Auto' will automatically set the search to your Minimum Duration
as defined in your pricing rules.
Initial Number of Guests:
This is the number of guests that the search box defaults to.
It will usually be set to '2' however, if you offer single accommodation,
you may wish to change to '1'.
Availability
Restrictions: This setting stops bookings being made within
the selected time frame.
Accept New Bookings up to: No
Restrictions If this setting is selected, customers will
be able to book online up until midnight 'today' for bookings
starting 'today' as defined by the time on the Exchange server
(which is GMT+10).
No Booking After Check-in will
stop online bookings being accepted for 'today' after the check-in
time that you've defined for each Product.
X hours before check-in or start
time of product - will stop online bookings being accepted
for the chosen check-in date up until the defined number of hours
before check-in. For example if you select '24 hours before check-in
or start time of product' bookings will only be accepted with
at least 24 hours notice before check-in time.
Your Timezone: Select your timezone and tick if you wish to allow for Daylight Saving. (Note that you will need to remember to come back an untick this when Daylight Saving is not in effect).

Once the database updates (wait half an hour or so), you can then check your Booking Pages to see the changes. Any changes you make will appear on the Book Pages linked to your own website, plus any other Distributor sites that use these Booking Pages. To check your Booking Pages, go to Book Now Button.
Google Analytics is the enterprise-class web analytics solution that gives you rich insights into your website traffic and marketing effectiveness. Powerful, flexible and easy-to-use features now let you see and analyze your traffic data in an entirely new way. With Google Analytics, you're more prepared to write better-targeted ads, strengthen your marketing initiatives and create higher converting websites. For more information please see http://www.google.com/analytics/.
Once you have an account with Google Analytics, you can choose to include your Booking Pages in any usage data recorded. This service can also record online transaction statistics if you have enabled the ‘E-Commerce Website’ setting in your Google Analytics Website Profile.
To link your booking pages to your Google Analytics account:
Click on the My Booking Pages tab in frontdesk.
Click on 'Analytics'.
Click the box for 'Enable Google Analytics for My Booking Pages'.
Enter the Web Property Id that was provided to you by Google Analytics when you created your Website Profile.
You can make a number of changes here that will enhance your customers' experience on the Booking Pages on your own website. They do not apply to your the Booking Pages used on other online Distributors. These settings are over and above those selected in the previous sections.
Keywords and Descriptions will help search engines find and elevate promotion of your Booking Pages on your website. Note: only the Title will be displayed on your Booking Pages.– Other fields are for use only in search optimisation.
Click on the My Booking Pages tab in frontdesk.
Click on 'Website Optimisation', then go to 'Keywords and Descriptions'.
Enter the required information, as described, in the 'Title', 'Description' and 'Keywords' fields.
Click Save.
Once your Inventory Setup is complete and your account has been made 'Active' for online bookings, a Book Now Button will be added to your website.
If you wish to see what your 'My Booking Pages' will look like once a customer clicks the Book Now Button:
Click on the My Booking Pages tab in frontdesk.
Click on 'Book Now Button'. You'll see that there are two different standard options for the way your Booking Pages can be displayed.
Click on one of the Options to view your Booking Pages.
Note that there are number of other customised options that we can provide for display of your Booking Pages. This includes linking to individual Products (rather than displaying all Products together in one grid), providing a Search Box on your home page or other web page, presenting the booking pages in an i-frame and more. For further information please call the Helpdesk.