![]()
![]()
![]()
![]()
![]() View a 'how to' video about editing bookings in frontdesk at www.v3sales.com
View a 'how to' video about editing bookings in frontdesk at www.v3sales.com
There are a number of changes that can be made to a booking:
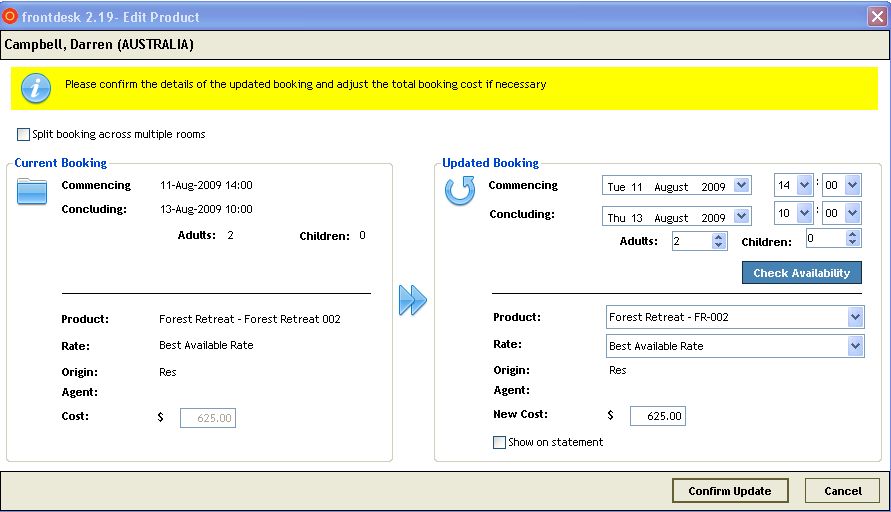
To start the edit either 'Drag and Drop' a booking, or 'Select Edit Booking'. See the following two sections for an explanation of the best method to start the edit. In both cases, the following screen will be opened:

If you wish to simply move a booking to a different date or different room, you may be able to use your mouse to drag and drop a booking within the Diary Screen. To do this:
From the "![]() Diary"
screen, locate the booking you require.
Diary"
screen, locate the booking you require.
Check that the new Product/Room and/or date is available.
If so, place your cursor over the booking you want to move.
Left-click and hold down the mouse while you drag the booking to the new Product or date. The booking will appear as a grey outline while you're dragging it.
Release the mouse. The booking will 'snap' to the default check-in/check-out times for that date and the "Edit Product" window will open.
Follow instructions to either Move a Booking to a Different Date or Move the Booking to a different Room Prior to Check-in.
Other types of edits require you to initiate Edit Booking in order to open the "Edit Product" window. There are a number of ways to initiate an edit as follows:
From the "![]() Diary"
screen, locate the booking you require in the calendar and right-click
on the booking.
Diary"
screen, locate the booking you require in the calendar and right-click
on the booking.
Select Edit Booking from the options displayed. This option allows you to easily update the individual item (eg Room) you've clicked on.
OR
From the "![]() Account"
screen, locate the Customer whose booking you wish to edit, right
click on the Customer's Name.
Account"
screen, locate the Customer whose booking you wish to edit, right
click on the Customer's Name.
Select Edit Booking from the options displayed. This option is best for when a Customer has a number of items in the same booking, and you need to update all of them.
Click 'Edit' next to the first item you need to change.
An Edit Product screen will be displayed as below. The screen is split into "Current Booking" details on the left and "Updated Booking" details on the right (which is where you will select new criteria for the booking. Choose one of the options described below to make your changes.
In the "Updated Booking" section, enter the new Commencing and/or Concluding dates and click on the "Check Availability" button. Details of available Products and corresponding price will be displayed with the original Product displayed as the default if it is available for the new dates.
If necessary, select a new Product/Room for this booking from the Products drop-down list if the original Product/Room is not available over the new dates. Check the price.
Click on the "Confirm Update" button.
The Customer Account will now reflect these changes, including any change in price. All Payment and Expense information will be remain the same, i.e. if a deposit has been made, this will still remain on the account.
From the Diary screen, locate the booking and check that the new date/s are available.
If so, Drag and Drop the booking to the new date. The "Edit Product" window will open with the new Commencing and Concluding Dates displayed in the "Updated Booking" section, along with any resulting change in price.
Check the new details and click the "Confirm Update" button.
The Customer Account will now reflect these changes, including any change in price. All Payment and Expense information will be remain the same, i.e. if a deposit has been made, this will still remain on the account.
From the Diary screen, locate the booking and check that the new Product/Room is available.
If so, Drag and Drop the booking to the new Room. The "Edit Product" window will open with the new Product/Room displayed in the "Updated Booking" section, along with any resulting change in price.
At this point, you can change the Product/Room or price if required. (For example, if you wish to upgrade to a better room for the same price, you may need to change the Rate Type to 'Freeform' then re-enter the total new price so that it is the same as the original booking).
Check the new details and click the "Confirm Update" button.
The Customer Account will now reflect these changes, including any change in price. All Payment and Expense information will be remain the same, i.e. if a deposit has been made, this will still remain on the account.
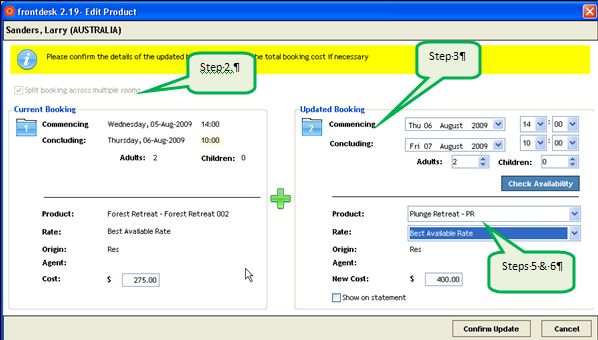
You will not be able to drag and drop a booking into a new room once the Customer has checked into the Room and/or spent a night in a Room. Therefore you will need to follow these steps in order to split the booking. Please also refer to the screenshot hereunder.
In the Edit
Product screen, first click in the box for "Split booking
across multiple rooms".
The "Current Booking" sections will then show details reflecting
the booking in the original room for the original commencing date
until the following day. This represents the first part of the 'split'
booking.
Within the "Updated Booking" section you can then define
the dates/details for the second part of the 'split' booking.
Under "Updated Booking" set the Commencing date to be the first date that you want the customer to be in the new room. Set the Concluding date to reflect when the customer will check out of the new room.
Click on the "Check Availability" button.
Select the required new room from the "Product" drop-down list.
The new cost will be automatically calculated. Adjust Rate Type and/or cost if required (For example if you are moving the Customer to a better room, but don't wish to charge extra, you'll need to choose Freeform Rate Type and overwrite the price for the total stay.)
Click on the "Confirm Update" button.

Select Edit Booking as per the instructions above.
In the "Updated Booking" section, select the required Rate Type.
If you choose "Freeform", you then have the option to overwrite the price to whatever amount you wish for the total stay.
Click on the "Confirm Update" button.
SEE ALSO Rate Types for more information on setting up Freeform Rate Types.
Select Edit Booking via
the Customer Folio: To do this, type the Customer's name into
the Search field and click on the "![]() Search"
button. Then click on "CF" beside the Customer's name to
open the Customer Folio.
Search"
button. Then click on "CF" beside the Customer's name to
open the Customer Folio.
OR
Find the booking on the Diary screen, right click on it and select
"View Customer Folio".
In the Customer Folio screen, click to highlight the relevant account. Click on the "Edit Booking" button in the left hand menu.
In the Edit Booking screen, from the Products drop-down list select, select the new room/Product to be added to the booking.
Click on the "Add to Booking" button.
Click on the "Confirm" button.
In the "![]() Status" screen, locate the booking
you wish to transfer.
Status" screen, locate the booking
you wish to transfer.
Right click on the booking and select Transfer Booking from the options displayed.
In the pop-up window, EITHER enter the details of the new customer and click "Create New" and complete the Customer Details OR click "Search" and select the required existing Customer.
The Payments Made on this Booking table will detail any payments made into the account belonging to the original Customer. These will be transferred to the new Customer.
Click on the "Transfer" button.
A new account will be created containing the booking you have transferred and any payments transferred. The original Account remains open.
If you wish to transfer any expenses or discounts from the original Account, you must go to the original Account and delete them, then re-enter them onto the new Account. SEE ALSO Expenses and Discounts.
A booking cannot be edited to change the Agent/Individual option or the Paid by Customer/Agent option.
To change an existing booking from ‘Booking by Individual’ to ‘Booking by Agent’ OR vice versa, it is necessary to first Cancel the Booking.
Then make a new booking with all the same details, selecting the new Individual/Agent option as required.