This is the area where all essential business information and contact details are entered into Frontdesk, as well as where a range of system preferences and settings are managed.
In order to fully utilise Frontdesk, ensure your full business details are accurate and up to date.
The following topics are covered in this section:
View/enter/edit Business Details and Business Description - including your tax status
View/edit General Settings including Industry Classification and Target Market selection
View/edit Distribution Settings including Conditions of Use and Booking Terms
Click on the Manage tab.
Click on Account Settings in the left hand menu. The Summary displays any information previously entered, and details of current settings.
The Business Description is the information about your business that customers will see when searching and booking online. It should include general details about the range of products, facilities and services offered.
Please note that fields denoted with * are mandatory.
Definition of terms and their purposes:
Tax Registered - If your business is VAT registered, you must select the "Yes" option to have VAT at 17.5% shown on tax invoices and enter a VAT number into the corresponding field. In addition, all your Products should be set as "Not Tax Exempt". SEE ALSO:Edit Products - Accommodation, or Edit Products - Tours/Attractions/Events,
Information Email - This is the email address that is displayed to the customer in the online environment.
Correspondence Email - This is the email address to which communication will be sent to you by the Licensee and from which you will send emails to your partners and affiliates.
Tax Invoice Notes - Enter the information that is to be printed on offline tax invoices and registration sheets. Note that online Conditions of Use and Booking Terms are entered into the Distribution Settings. SEE ALSO View/Edit Distribution Settings.
In Manage, click on Account Settings on the left hand menu.
Click on Modify Business Details.
Enter and update as required the information in all fields. An asterisk indicates that the field is mandatory.
Click on the ".gif) Save" button.
Save" button.
It is essential that pictures of your business are uploaded for customers to see when searching and booking online is available. These should be general images - photographs of specific Products can be uploaded when you set up your Products and Inventory. SEE ALSO Create New Products and Edit Products.
 The images must be 320 pixels x 240 pixels and in a jpeg format.
In Manage, click on Account Settings on the left hand menu.
Click on Modify Business Details.
In the Upload Business Picture field, click on the "Browse" button and find the image to be uploaded on your computer. In the pop-up window that appears, select the required image and click on the "Open" button.
Click on the " Save" button.
This information will appear at the bottom of customer Tax Invoices, Agent Order Confirmation/Tax Invoices, and Registration Sheets. It may include any information that you wish your customers to see only once payment has been confirmed, for example, procedure for late arrivals, key pick-ups etc, and also offline Conditions of Use and Booking Terms.
In Manage, click on Account Settings on the left hand menu.
Click on Modify Business Details.
In the Tax Invoice Notes field, enter and update information as required.
Click on the " Save" button.
This is a pre-determined number unique to your business which identifies your business and products in 3rd party systems such as the VisitBritain and EnglandNet database.
In Manage, click on Account Settings. The Content ID is displayed at the top of the screen.
In order to use Frontdesk, you must agree to provide your bank account details to eviivo so that the Monthly Fee can be direct debited from your account. During the setup process, you will have downloaded and agreed to a Direct Debit Authority with eviivo. Settlement details can only be edited by eviivo.
In Manage, click on Account Settings on the left hand menu, then Settlement Details.
A summary of the bank account details previously entered is displayed, and cannot be edited.
To change this details, contact the Helpdesk for further information.
Acting as a merchant means that you are able to process credit/debit card payments from online customers. The details of your merchant bank account are displayed within Payment Details.
In Manage, click on Account Settings on the left hand menu, then Payment Details.
A summary of the bank account details previously entered is displayed, and cannot be edited.
To change this details, contact the Helpdesk for further information.
SEE ALSO View/Edit General Settings for full instructions.
SEE ALSO View/Edit Distribution Settings for full instructions.
Activate Text Message/SMS Booking Notifications
If you have your own merchant account, you will be able to subscribe to the text message (SMS) service that will notify you of any new bookings by text message to your mobile phone. You will still receive an email notification and the booking will appear in your diary.
There may be a charge for receiving notifications by SMS.
Customers on the Interim Merchant Account are not eligible to opt into this service. Please contact the eviivo frontdesk® Customer Support Team on 0870 121 3107 or support@eviivo.com for assistance with setting up your own online merchant account.
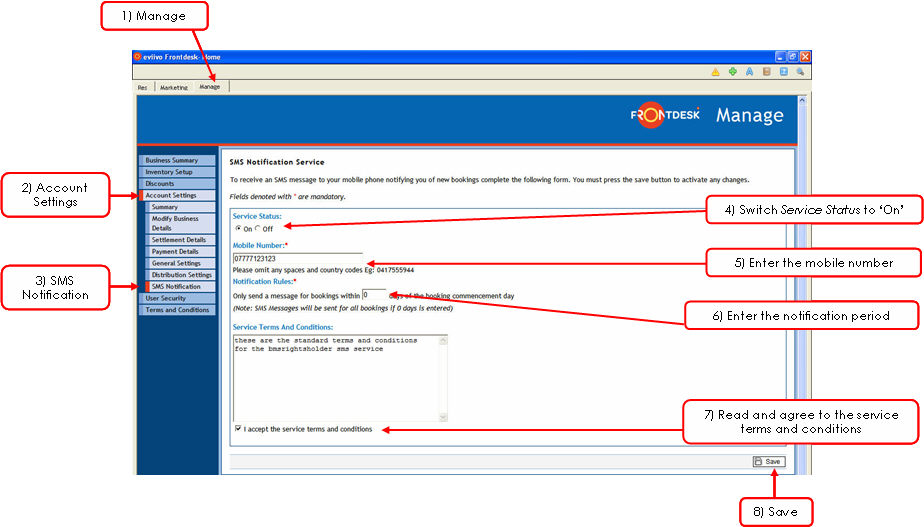
Click on the Manage tab
Click Account Settings from the menu on the left
Click SMS Notification from the menu on the left
In the SMS Notification Service screen, switch the Service Status to ‘On’
Enter the mobile phone number you would like SMS notifications to be sent to. Do not enter country codes or spaces
The Notification Rules section allows you to determine if you would like to receive notifications for bookings that start within a particular time period only. For example, if you only want SMS notification of new online bookings that start within the next 2 days, enter 2 here; if you wish to be notified of all new online bookings regardless of when they start, enter 0 here
Read and agree to the Service Terms and Conditions
Click " Save" at the bottom right of the page and your SMS notification service will be activated immediately
Activate SMS/Text Message Notification: