![]()
![]()
![]()
![]()
This section of the Help Guide provides two sets of instructions for making a new offline booking, i.e. putting a booking that you have taken over the phone, via email or fax into your electronic diary.
A Quick Booking, that is, entering the minimum amount of customer information to make a new booking.
More detailed steps for making a new booking and an explanation of all sections of the New Booking screen.
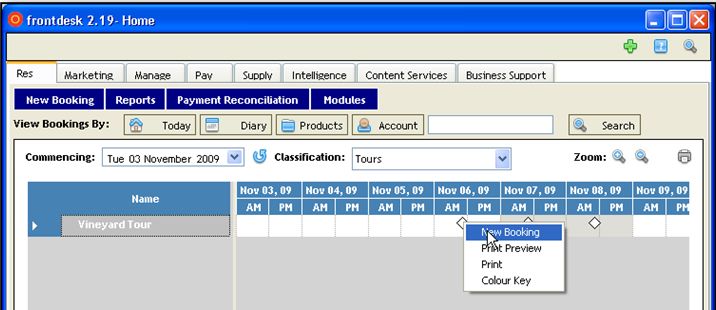
In Res, click on "View Bookings by Diary" button. Tour/Event/Attraction Products are represented by a diamond icon. A grey diamond represents a Tour with no bookings, a blue diamond represents a Tour with availability (roll the cursor over the diamond to view number of places available), and a red diamond represents a fully booked Tour with no availability.
Right-Click on the diamond icon that represents an
available Tour for the commencing date you require and click New Booking.
The New Booking screen will open. Under 'Customer Details', enter the Customer's Name as a minimum, and Contact Number if you wish.*
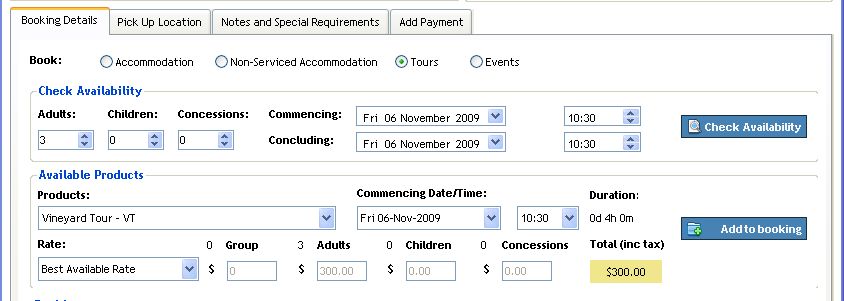
In the 'Booking Detail' tab, under 'Check Availability', if required, change the number of Adults, Child, Concession customers for this booking and click on the Check Availability button.
Under 'Available Products' check that the Tour you require is selected.
Select the 'Rate' you require from the drop-down list. The available Rate Types will depend on the prices you've previously applied to this Product when you created your Seasonal Schedules in Manage.
Click on the Add to Booking button. The booking information can be seen at the bottom of the screen.
Click on the Confirm button.
*If an existing customer, click on the Find Guest button to find their customer record.
There are a number of different ways to initiate a new booking. Choose the appropriate method depending on the circumstances of the booking and your business requirements.
From any of the four standard View screens, click on the "New Booking" button in the top left hand corner of the screen. The New Booking screen is opened, and all required date, time, product and customer information is to be entered; OR
From the View Bookings by Diary screen, right-click and select "New Booking", on an available Tour/Event/Attraction for a particular date. The New Booking screen will open with details in the Available Options table defaulted to the Product you have selected. All customer information to be entered; OR
From the View Bookings By Diary screen, double-click on an available Tour/Event/Attraction for a particular date. The Current Bookings screen will open and the Availability and other booking details can be checked if required. Then click on the “New Booking” button. The New Booking screen will open with details in the Available Options table defaulted to the Product you have selected. All customer information to be entered; OR
From the Search results screen, click the "NB" button (New Booking). The New Booking screen is opened. All date, time and product information is to be entered. The customer details fields are automatically populated.
From the Customer Folio, click on the "New Booking" button. The New Booking screen is opened. All date, time and product information is to be entered. The customer details fields are automatically populated.
Click on the Customer Details tab.
Enter First Name and Last Name of the customer or Search for an existing customer (a customer that has booked your products previously) - Click on the "Search" button, enter two or more characters into the Last Name or First Name field and click on the "Search" button. Click on the correct Customer's Name from the list of search results.
Enter Title, Work Phone number and/or Home Phone number if required.
To enter more information about this customer, click on the "More>>" button and enter information into any or all fields. Note that if you have selected an existing customer, all previously entered information will be automatically populate the fields on this screen. You may amend any details as required - be sure to "Save" if changes are made.
In the New Bookings screen, select the Booking Type - by Individual or by Agent.
If Booking Type:By Agent is selected, select either Products to be paid by:Customer or Products to be paid by:Agent.
Select the Booking Status. For Confirmed, it is possible to take a full or part payment. For Tentative, no payment can be processed until the status is changed to Confirmed.
If Booking by Agent is selected, select the name of the Agent responsible for this booking from the drop-down list. SEE ALSO Add New Offline Agent.
To apply a pre-set discount to this booking, select the relevant Discount Program from the drop-down list. SEE ALSO Create New Discount Programs.
Enter Reference Information and a Voucher Number if required. These fields are usually used for recording Agent's reference information and will appear on the Customer's Tax Invoice and the Agent Order Confirmation/Tax Invoice.

In the “Book” section, click to select either Tours, Attractions, or Events. (These selections will only be available if you have previously set up more than one type of Product in Manage.)
Under Check Availability, enter the number of Adult, Child, Concession customers for this booking.(Note that if a Group Ticket price has been defined in Manage, the relevant price will be automatically calculated and appear under the 'Group' price in the search results.)
Enter the Commencing Date of the Tour/Event/Attraction.
Click on the Check Availability button to display a list of available Products commencing on the date entered.
Select a Product from the Products drop-down list.
Under Rates, select the applicable Rate Type from the drop-down list. To enter a specific price, choose Freeform.
If Freeform was the selected price type, enter the total amount to be charged for the booking into the Price field.
A summary of the product, dates and price selected will be displayed. If this is correct, click on the Add to Booking button.
To add more products to this booking, repeat steps 5 to 8.
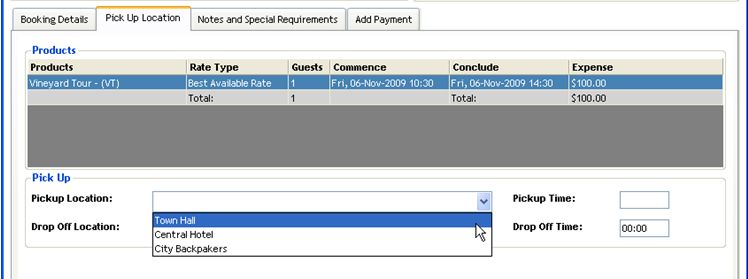
You can nominate for this customer to be picked-up from a pre-set list of Pick-up Locations as previously defined in Manage. These locations will then print out on the Manifest Report for your reference.
Click on the 'Pick Up Location' tab.
Select the required location from the drop-down list.
If required, you can also add a freeform drop-off location and time.
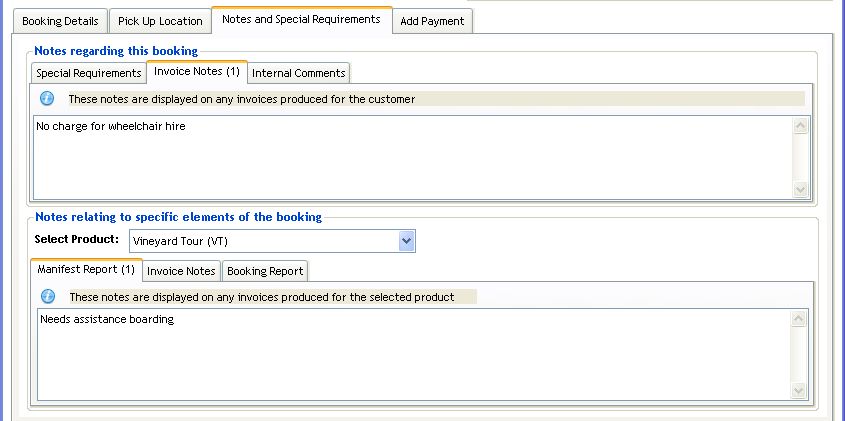
It is possible to add notes at the time of booking that will appear on various reports and relate either to the booking generally, or a specific Product in the booking.
Click on the "Notes and Special Requirements" tab.
Under "Notes regarding this Booking" select the tab you require.
Special Requirements are displayed when you view the Customer Folio.
Invoice Notes will appear at the base of the Tax Invoice to the Customer
Internal Comments will only be displayed here when you view booking.
Under "Notes relating to specific elements of the booking", first select the Product that the note relates to from the drop-down list.
Manifest Report notes will appear on the Manifest Report
Invoice Notes will appear next to the relevant Product on the Tax Invoice to the Customer
Booking Report notes will appear on the Booking Report
To add further notes, select on another product in the drop-down list, and repeat Step 3.
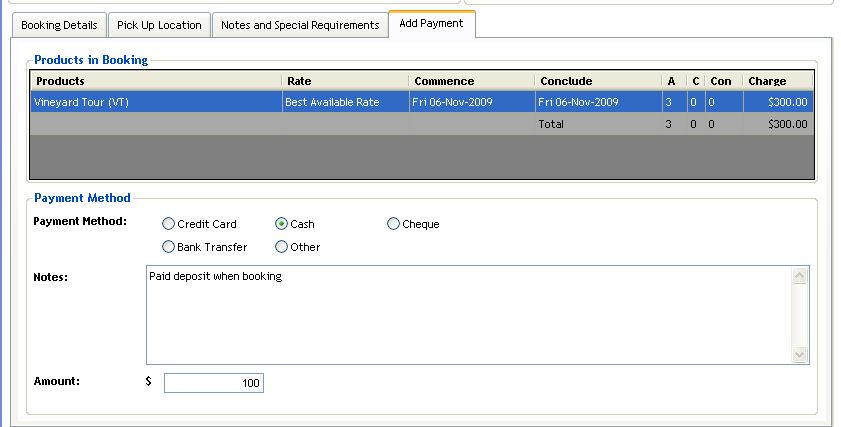
To receive and process a payment for either the full amount of the booking or a deposit at the time of booking:
Click on the "Add Payment" tab.
Click on the Payment Method that the customer is using to make this payment.
If required, add any information about this payment into the Notes field.
Enter the amount you have received.
Review/add information into any of the above areas covered above.
When all details are completed, click on the Confirm button at the bottom of the screen.
Click on the links below for instructions on each of the next possible steps for the booking: